Sunday, September 30, 2012

Swatchfest: Zoya Oranges, Pinks and Reds

I now declare this Zoya week at my blog!  It's gonna be all Zoya, all the time.  I have a whole bunch of Zoya polishes, and I wanted to swatch and photograph them all for you guys.  I did so in a comparison format to show you (and myself) the differences between the colors.  This post will be the oranges, pinks and reds that I own.  On to the swatches!

I've got Pru and Tess to show you first.  Pru is a purpley-pinky, soft dusty color with a gold shimmer in it.  It's a pretty unusual color, and I really like how different it is from the purples or pinks I own.  Tess is a pretty incredible rose metallic that I took a total gamble on buying, as I couldn't find many decent swatches.  Below is a SINGLE coat of Tess!  Incredible!
 Index/Middle: Pru,  Ring/Pinky; Tess

 Next, I've got Rica and Tiffany.  I was a little worried when I bought Tiffany that it would be too similar to Rica, but I was pleasantly surprised as to how different they were.  Rica has much brighter pink and orange tones, while Tiffany is a nice pinkish-gold shimmer.  I think Rica would be a great version of this pinky-orange-gold for the summer, and Tiffany a perfect option for the fall/winter.
 Index/Middle: Rica, Ring/Pinky: Tiffany

I recently discovered that I actually look okay in orange, so I bought a few oranges from Zoya to enjoy.  Kaufda is a reddish copper that is pretty unusual and very, very flattering.  I chose Pia to get a brighter orange that wasn't a neon creme.  I'm not sure how Pia compares to, say, Lianne, Elise, Ginger or Sienna, but I do like how brilliant it looks, and it has a nice shimmer.  I did have visible nail line with 2 coats, I think a third would be in order to make sure that's all covered up.
 Index/Middle: Kaufda, Ring/Pinky: Pia

These next polishes aren't similar at all, so the comparison part of the manicure is kind of moot, but they are both fabulous summery pinks.  Ali is a super neon pink that dries with a rubbery, semi-matte finish (like most neons), while Rory is a metallic lavender-pink that applies like a dream.  I could've easily gotten away with one careful coat for each of these polishes, but I did two to be safe.

 Index/Middle: Ali, Ring/Pinky: Rory
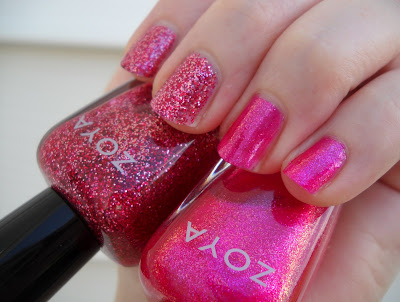
Sparkle pink!  I love both of these sparkly pinks.  Astra is packed with magenta and silver glitter in a clear base; it's kind of amazing how well it covers without being gritty or gummy.  With two coats of Astra, I didn't have any visible nail line.  I swatched it next to Gilda, which is hands-down the best pedicure pink ever.  It's a glassfleck cool-leaning pink that just pops without being a typical neon.  It's a great base color for watermelon nail art too!  The visible nail line in this picture isn't as noticeable in person, but a third coat would eliminate it for sure.
 Index/Middle: Astra, Ring/Pinky: Gilda

Next, the reds!  Jade is the first, a jelly-like red glitter polish.  The glitter is very subtle, but the tint of red is a particularly classic red, so it'd be a good go-to for glamour.

Next we have Nidhi and Reva.  Nidhi is a warm-leaning red with gold/blue microglitter in it.  This color is super hard to capture, as it has a subtlety in its blue flashes and gold shimmer that you probably need to experience in person.  Next is Reva, a darker red with straight gold shimmer, a simpler color but with a bolder impact.
 Index/Middle: Nidhi, Ring/Pinky: Reva

 Index/Middle: Nidhi, Ring/Pinky: Reva, Thumb: Jade

Finally the vampiest of the bunch, Blair and Valerie.  Blair is a deep burgundy with a glowing shimmer that looks just gorgeous, and is going to be perfect for winter drama.  Valerie, probably technically a cool color but very warm-leaning, is possibly one of the greatest polish colors ever, so I saved it for last (best for last and all).  Valerie is a dark purple/burgundy base with gold/silver/possibly some green shimmer to it.  I'm always surprised when I put it on, as to how fascinating a color it is.
 Index/Middle: Blair, Ring/Pinky: Valerie

Check in later this week for the cool-toned Zoyas I have!

Disclaimer: All products for this post were purchased with my own money.  All opinions are my own.

Friday, September 28, 2012

Swatchfest: Hot Mess Lacquers!

I got these polishes about two months ago, and I just love them to pieces.  Hot Mess Lacquers is an indie polish brand that has started up recently.  I'm picky about indies; I don't like milky bases, I don't like certain bottle types, I don't like ones that I think look "barfy", I don't like certain densities of glitter (too sparse/too dense).

Now, I'm just one person, and there's a market for just about any polish, but Hot Mess definitely satisfies my polish criteria; the bases of the polish I got were nicely pigmented jellies, the glitter was dense and easy to get out, but not so dense that the polish was unusable or gritty, the glitters were interesting sizes/shapes but didn't curl one bit, there was no bleeding and no staining of my nails, and the bottles are cute and easy to use.  Wonderful!

I want you all to note, none of these swatches have topcoat, so all the shine and smoothness you see is in the polish itself.  Seriously, awesome formulas!

I bought 4 polishes from the Hot Mess line.  From left to right in the photo below, they are: Red Headed Step Child, Aquanet, Cupcake and Yankee Star.

Red Headed Step Child is a strawberry red jelly base with medium red hexes and little black hexes.  The formula on this is super nice, and I didn't even have visible nail line after 2 coats!  This is one juicy looking polish, and a nice twist on the classic red nail.
Swatches include: Index, 2 coats RSHC; Middle, one coat Julep Glen, one coat RHSC; Ring, one coat Smoke and Ashes, one coat RHSC; pinky, one coat white, one coat RHSC.

Aquanet, aside from having a hilarious name, is a perfect synthetic, acidy pale purple jelly with a ton of different glitter shapes including HUGE hexes that are super easy to place and very, very dramatic.  I love the little square glitter too, and how the holographic effect shines through the jelly base.  
Swatches include: Index, 2 coats Aquanet; Middle, one coat Anise Total Temptress, one coat Aquanet; Ring, one coat Smoke and Ashes, one coat Aquanet; pinky, one coat white, one coat Aquanet.

Cupcake is a great way to encrust your nails in jewel-like glitter; I've tried to come up with a way to describe this corally, golden, pinky polish, and the best I can come up with is that it looks like some sort of gorgeous starfish.  It's textural, shimmery, shiny and beautiful.  It is the thickest of the four, so working to get a manageable coat can take a little bit of effort, but it's worth it.  This again has those big hexes, that I've really never seen before in a polish, and are an awful lot of fun to wear.
Swatches include: Index, 2 coats Cupcake; Middle, one coat Cos Bar Bronze, one coat Cupcake; Ring, one coat Smoke and Ashes, one coat Cupcake; pinky, one coat white, one coat Cupcake. 


Finally, Yankee Star.  When I bought this, I didn't realize that all the glitter in it would be holographic, so imagine my surprise and delight when I was expecting plain silver glitters and pulled out a veritable disco ball of rainbows and shiny prettiness!  Yankee Star has stars, bar glitter, squares, hexes, tiny glitter, you name it, all in a clear base.  

The base in Yankee Star is the thinnest, which means the bigger glitter will sink slightly (not all to the bottom, but they will settle toward the middle of the bottle), but setting the bottle on its side for a few minutes  makes the glitter totally accessible.  The thinner base also means that multiple coats don't result in too much polish on your fingers, saving you dry time.
Swatches include: Index, 2 coats Yankee Star;  Middle, one coat Orly Stone Cold, one coat Yankee Star; Ring, one coat Smoke and Ashes, one coat Yankee Star; pinky, one coat white, one coat Yankee Star.

Hot Mess Lacquers are available on Etsy, and are often listed on Copious, so any credits you have could be used to get your hands on some of this fantastic polish!

Disclaimer: all products for this review were purchased with my own money, and all opinions are my own.

Wednesday, September 19, 2012

Artsy Wednesday: Neon!

I thought neon was a great theme to use for the last week of summer, and I was inspired to make a farewell-to-summer manicure of neon watermelons!

Now, neon is notoriously hard to photograph, so you'll just have to trust me that my nails are BRIGHT.  I used Zoya Ali for the watermelon flesh, then used OPI Gargantuan Green Grape for the whitish part of the rind, Savina Green Apple for the light green and Milani Neon in Fresh Teal for the dark green (I have no idea how a dark-ish turquoise is neon, but it says so on the bottle so who am I to argue?)  


I had an awful lot of fun with this, and am especially proud that I did both hands.  I got a pedicure today and even the pedicure technician complimented me!
I'm really honored to be able to participate in Artsy Wednesday, and you should all DEFINITELY check out these other, very talented Artsy Wednesday participants.  

Wednesday, September 12, 2012

Artsy Wednesday: Galaxy Nails

In my giveaway, I asked for comments on what people would like to see more of, and nail art tutorials was the most common response.  So!  I'm going to try to give a step-by-step for every Artsy Wednesday I do, so people know how I achieved the look.

Tuesday, September 11, 2012

Giveaway Winners!

The following winners were selected via rafflecopter:
a Rafflecopter giveaway
Congrats to you all!  I've already heard from Gina K. and Kim J., but not Sherri K.!  Calling Sherri!  I have something for you!


If I don't hear from her by Midnight PST on Weednesday, Sept. 12th, I'll bump up Gina K. to first prize and pick a new third prize winner.

Wednesday, September 5, 2012

Artsy Wednesday: Inspired by a Print or Pattern

FYI: I've got a pretty cool giveaway going on (FingerPaints Flakies, oooh!), you should check it out!

I had grand, grand visions for this Artsy Wednesday.  The patterns I envisioned on my nails included a pink and blue plaid from my childhood, flocked Venetian wallpaper, backgammon boards, etc.  The ideas got bigger and bigger until I realized that unless I went pretty simple, I'd be disappointed.  So, in true K.I.S.S. style, I chose a simple little pattern and it turned into the best manicure I've ever done!!


Lisa Frank leopard print nails!  I used a base of Milani Cyberspace, then used Zoya Ali and Wet n' Wild Ebony Hates Chris to make the little spots.


  I can't stop looking at my nails!  From the neon to the holo blue, this manicure is the bomb.  I want to do leopard spots in all types of color schemes too.  From natural browns and beiges to lilacs and purples to silvers and whites.  I think I'm going to go a little leopard crazy!


I'm really honored to be able to participate in Artsy Wednesday, and you should all DEFINITELY check out these other, very talented Artsy Wednesday participants.  You should also DEFINITELY check out my GIVEAWAY!:

Monday, September 3, 2012

Happy Labor Day! 39 Followers Giveaway!

To celebrate my little blog hitting 39 followers, I'm throwing a giveaway! Yay!

Why 39?  Three reasons.  First, I like prime numbers.  Second, I feel like having a giveaway; I love sharing the love of polish with other people :).  Third, I'm really grateful to have been able to build up such a following in a short time, and I wanted to express my gratitude!

I'm giving away three prizes:  First prize is brand new bottles of Finger Paints Special Effects topcoats in Flashy and Flecked going to one person.


The Second and Third Prizes are a single brand new bottle of Finger Paints Special Effects topcoats in Flashy to each winner.  I happened to stumble upon a jackpot of these topcoats at my local Sally's, and I wanted to share the wealth!


On to the rafflecopter!  This is open to U.S. Residents only (sorry International followers, money's a bit tight since classes start soon, someday I'll have an international giveaway!).  Good Luck!  Ends in one week.

a Rafflecopter giveaway

Saturday, September 1, 2012

Swatching using Cabochons, or, I am the crazy polish lady.

 Swatching your collection can be an important part of the life of the polisher.  If you have more than a few polishes, especially more than a few of each color, as I have obviously ended up with, having the ability to compare colors and see what they'd look like against your skin before applying can be pretty valuable.

I tried swatching on nail wheels, just the basic ones you buy at Sally's Beauty, and while they came in handy for a while, I found that they were a little flimsy, and I ran out of room on them.  I had to swatch blues on my nudes wheel, greens on my pinks wheel, etc., and it was driving me batty.  I could've invested in infinite numbers of wheels, but the ability to compare would still be hampered.
Swatch sticks (fake nails attached to small wooden or plastic sticks) are also pretty popular, and I may end up doing that as well, but I got the idea (from some fabulous members of a polish thread on Something Awful) to paint all of my polishes on the backs of glass cabochons (acquired at the dollar store), then attach them to magnets and stick them to a metal surface (as of right now, a cookie sheet I got at TJ Maxx, because it's big enough and once I find a more permanent metal surface I can hang somewhere, I can bake cookies!)
For glitters, I painted the backs with 2 coats, then a coat of black, and for all other polishes, I put 2 coats on, then a coat of white to ensure opacity so the adhesive on the magnets doesn't show through the polish.  I numbered the cabochons and their corresponding bottles with the same number, so I can match the cabochon with the polish I used on it; I'm hoping to have the numbers in a spreadsheet soon for quick reference.  I had a heck of a good time doing this, and now have some really pretty interactive art to show me what my polishes look like!

One thing to keep in mind if you plan on doing this; don't get cabochons with any iridescence on them.  It will   mar the color of the polish as it shines through the glass, making your swatches inaccurate.  Also, ventilate!  You likely won't get bubbles in your polish like you might if you have a fan on and windows open when painting your nails, and the fumes could build up really quick.